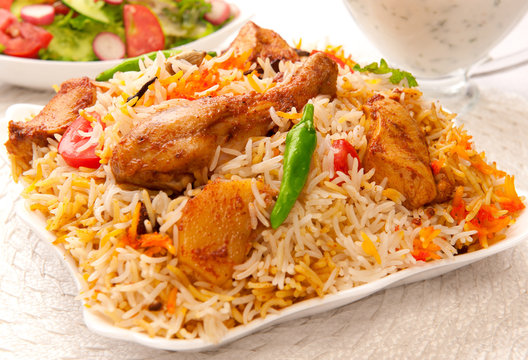
Hyderabadi Style Dum Biryani Recipe
हैदराबादी स्टाइल दम बिरयानी रेसिपी
Hyderabadi Dum Biryani is one of the most famous and flavorful dishes in Indian cuisine. Known for its aromatic spices, tender meat, and perfectly cooked rice, this biryani is a true treat for your taste buds. In this blog, I will share an easy-to-follow recipe for making Hyderabadi Dum Biryani at home.
हैदराबादी दम बिरयानी भारतीय व्यंजन में सबसे प्रसिद्ध और स्वादिष्ट डिशेस में से एक है। इसकी खुशबूदार मसाले, नर्म मांस और perfectly पकी हुई चावल, इसे हर किसी का पसंदीदा बनाती है। इस ब्लॉग में मैं आपके साथ एक आसान रेसिपी शेयर करूंगा जिसे आप घर पर हैदराबादी दम बिरयानी बना सकते हैं।
Ingredients / सामग्री:
- Basmati Rice – 1 ½ cups (बासमती चावल – 1 ½ कप)
- Chicken / Mutton – 500 grams (चिकन / मटन – 500 ग्राम)
- Onions – 2 large (प्याज – 2 बड़े, पतले कटे हुए)
- Tomatoes – 2 (टमाटर – 2, कटे हुए)
- Yogurt (Dahi) – ½ cup (दही – ½ कप)
- Ginger-Garlic Paste – 1 tbsp (अदरक-लहसुन का पेस्ट – 1 बड़ा चमच)
- Biryani Masala – 2 tbsp (बिरयानी मसाला – 2 बड़े चमच)
- Coriander leaves – ¼ cup (धनिया – ¼ कप, कटा हुआ)
- Mint leaves – ¼ cup (पुदीना – ¼ कप, कटा हुआ)
- Green Chilies – 2-3 (हरी मिर्च – 2-3, लंबी काटी हुई)
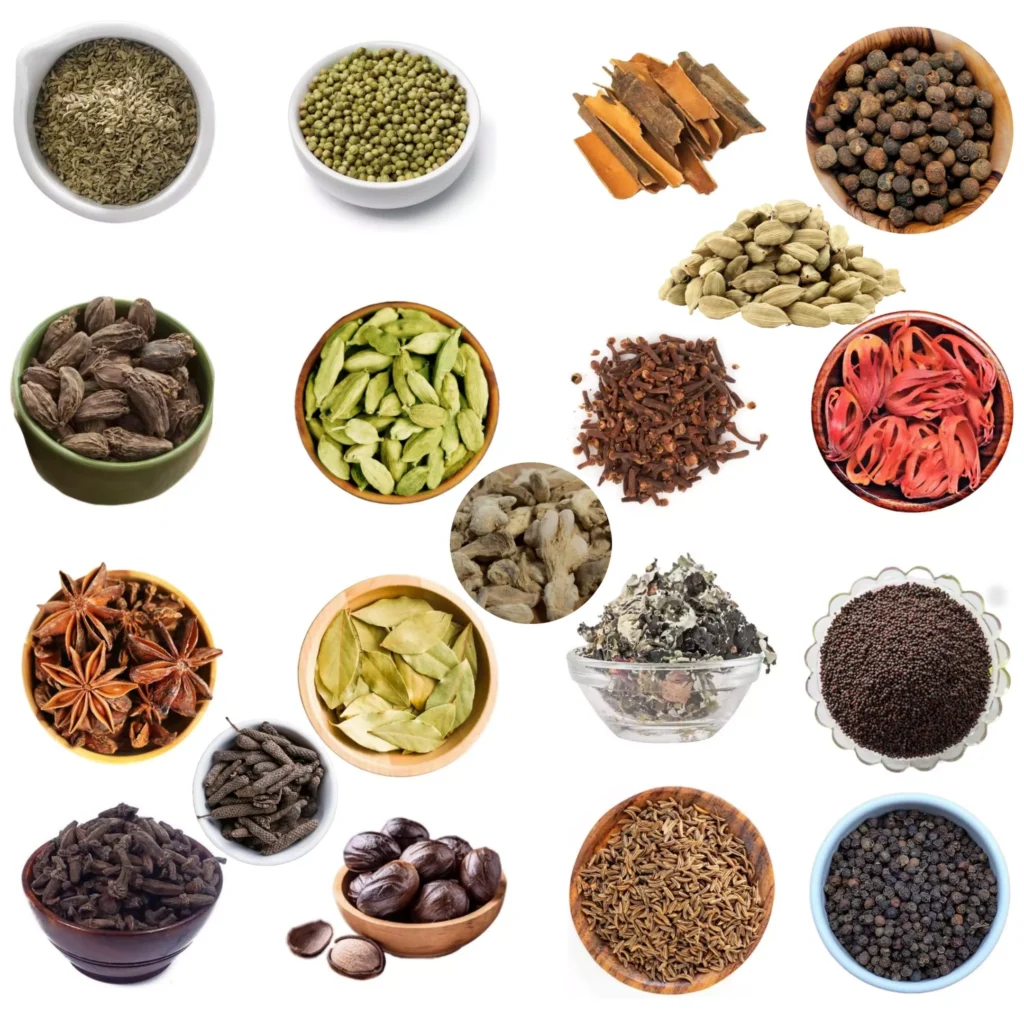
- Whole Spices (Cloves, Cardamom, Cinnamon, Bay Leaf) – as needed (सभी मसाले – स्वाद अनुसार)
- Saffron (Kesar) – a pinch (केसर – 1 चुटकी, दूध में भिगोकर)
- Lemon – 1 (नींबू – 1)
- Ghee – 3 tbsp (घी – 3 बड़े चमच)
- Oil – 2 tbsp (तेल – 2 बड़े चमच)
- Salt – to taste (नमक – स्वाद अनुसार)
Preparation Method / विधि:
Step 1: Prepare the Rice / चावल पकाना:
- First, wash the basmati rice well and soak it in water for about 30 minutes.
- In a large pot, boil water and add whole spices like cloves, cardamom, cinnamon, and bay leaf.
- Once the water starts boiling, add the soaked rice and cook until it is about 70% cooked. Drain the water and set the rice aside.
चावल तैयार करना:
- सबसे पहले बासमती चावल को अच्छे से धोकर लगभग 30 मिनट के लिए पानी में भिगो दें।
- एक बड़े बर्तन में पानी गरम करें और उसमें लौंग, इलायची, दारचीनी और तेज पत्ता डालें।
- जब पानी उबालने लगे, तब भिगोए हुए चावल डालकर लगभग 70% तक पकाएं। फिर पानी छानकर चावल अलग रख लें।
Step 2: Prepare the Chicken/Mutton Marinade / Chicken/ Mutton की मसालेदार मिक्सचर तैयार करना:
- In a bowl, add chicken or mutton pieces. Add yogurt, ginger-garlic paste, biryani masala, lemon juice, salt, and mix everything well.
- Let it marinate for at least 30 minutes. For better flavor, you can marinate it for a few hours.
मांस की मसालेदार मिक्सचर तैयार करना:
- एक बर्तन में चिकन या मटन के टुकड़े लें। इसमें दही, अदरक-लहसुन का पेस्ट, बिरयानी मसाला, नींबू का रस, नमक डालकर अच्छे से मिक्स करें।
- इसे कम से कम 30 मिनट के लिए छोड़ दें। ज्यादा स्वाद के लिए, आप इसे कुछ घंटों के लिए भी रख सकते हैं।
Step 3: Frying Onions / प्याज तलना:
- In a pan, heat some oil and fry the thinly sliced onions until they turn golden brown.
- Remove the fried onions and set them aside for garnishing.
प्याज तलना:
- एक पैन में तेल गरम करें और उसमें पतले कटे हुए प्याज को सुनहरा होने तक तलें।
- तले हुए प्याज को निकालकर अलग रख लें, ताकि इन्हें बाद में सजाने के लिए इस्तेमाल किया जा सके।
Step 4: Cooking the Meat / Chicken/ Mutton पकाना:
- In a large pot, heat some ghee and oil. Add the marinated meat and cook on medium heat until the meat is tender and cooked through.
- Add chopped tomatoes, green chilies, and cook until the tomatoes soften.
मांस पकाना:
- एक बड़े बर्तन में घी और तेल गरम करें। इसमें मसालेदार मांस डालकर मध्यम आंच पर पकाएं।
- जब मांस अच्छे से पक जाए और नर्म हो जाए, तब उसमें कटे हुए टमाटर और हरी मिर्च डालकर पकने दें।
Step 5: Layering the Biryani / बिरयानी की परतें लगाना:
- In the same pot, layer the cooked meat at the bottom.
- Add a layer of cooked rice on top of the meat.
- Sprinkle chopped mint leaves, coriander leaves, fried onions, and saffron milk.
- Repeat the layers of rice and meat, finishing with a rice layer at the top.
बिरयानी की परतें लगाना:
- अब उस ही बर्तन में सबसे पहले पकाए हुए मांस की एक परत डालें।
- उसके ऊपर पके हुए चावल की एक परत डालें।
- फिर हरा धनिया, पुदीना, तला हुआ प्याज और केसर का दूध छिड़कें।
- इस प्रक्रिया को फिर से दोहराएं, और आखिरी परत चावल की डालें।
Step 6: Dum Cooking (Slow Cooking) / दम पर पकाना:
- Cover the pot with a tight lid or seal it with dough to trap the steam inside.
- Cook the biryani on very low heat for about 20-30 minutes. This process is known as “Dum” and ensures that the flavors blend perfectly.
दम पर पकाना:
- बर्तन को अच्छे से ढककर या आटे से सील कर दें, ताकि भाप बाहर न जाए।
- बिरयानी को बहुत धीमी आंच पर लगभग 20-30 मिनट तक पकने दें। यह प्रक्रिया “दम” कहलाती है और बिरयानी के सारे फ्लेवर एकसाथ मिलते हैं।
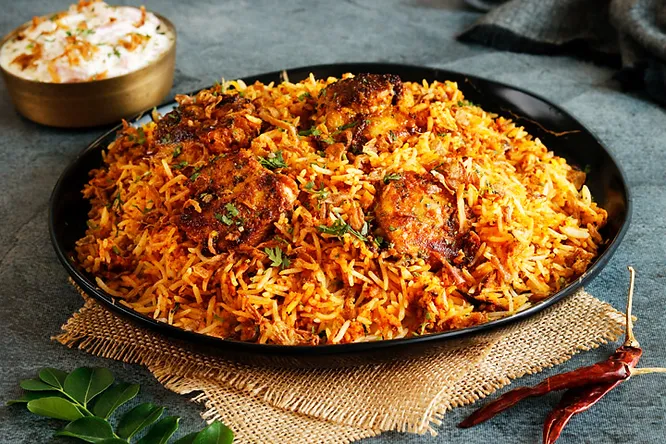
Step 7: Serve / सर्व करना:
- After cooking, remove the lid and gently fluff the biryani.
- Serve hot with raita or a salad on the side.
सर्व करना:
- पकने के बाद, ढक्कन हटाकर बिरयानी को हलके हाथ से मिलाएं।
- गरमा-गरम बिरयानी रायते या सलाद के साथ परोसें।
Tips for Perfect Hyderabadi Dum Biryani / हैदराबादी दम बिरयानी के लिए टिप्स:
- For a rich flavor, always use ghee instead of oil.
- You can add rose water or kewra essence for an added aroma.
- If you prefer a spicier biryani, add green chilies while cooking the meat or while layering the rice.
कुछ खास टिप्स:
- स्वाद बढ़ाने के लिए हमेशा घी का उपयोग करें, तेल की बजाय।
- अगर आपको ज्यादा खुशबूदार बिरयानी पसंद है, तो आप गुलाब जल या केवड़ा जल भी डाल सकते हैं।
- अगर आपको तीव्र मसालेदार बिरयानी पसंद है, तो हरी मिर्च मांस पकाने के दौरान डाल सकते हैं।
Now, you are ready to make a delicious Hyderabadi Dum Biryani! Enjoy the burst of flavors and share the love of this classic dish with your friends and family! 😋🍽
अब, आप तैयार हैं एक स्वादिष्ट हैदराबादी दम बिरयानी बनाने के लिए! इसका स्वाद लें और इस क्लासिक डिश का आनंद अपने परिवार और दोस्तों के साथ शेयर करें!
Leave a Reply